How to Setup Netgear WiFi Extender?
The commonly used method for new extender setup is the Manual method. Here’s how you can complete Netgear extender setup manually:
- Go to mywifiext.net login page.
- Accept the terms and conditions of using the extender.
- The New Extender Setup page will appear.
- As soon as the available networks are scanned, select the SSID of your main router.
- Input the main router’s WiFi password.
- Specify the admin password for the extender.
- Assign the 2.4 GHz and 5 GHz settings to the extender.
- Save the changes.
- Update the firmware by following the on-screen instructions.
- Register your extender on MyNetgear portal.
- You have completed Netgear WiFi extender setup!
Note: In case, the setup wizard asks for the Netgear extender login details, you have to enter admin into the Username field and password into the Password field. The default WiFi password is given on the extender’s label.
Netgear Extender Setup WPS Method
Setting up Netgear extender using WPS does not require using a computer or login details. You can connect your router and extender just using a button. The steps are mentioned below:
- Place your extender and main router in the same room.
- Switch on both devices (if you haven’t done it yet) – 1st router and 2nd Netgear extender.
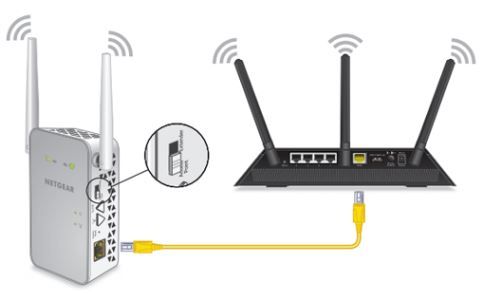
- Press the router’s WPS button.
- Without waiting, press the WPS button on your Netgear extender.
- If your extender supports dual-band frequency, repeat the above steps once again.
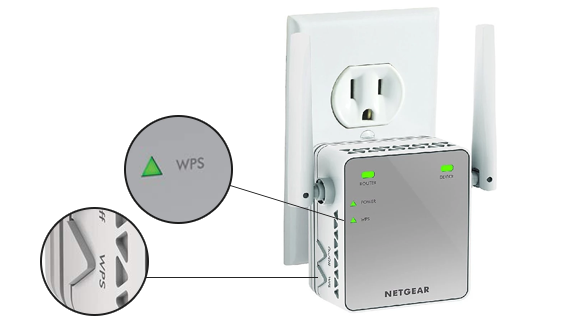
Quick Tip: If there is no WPS button on router, you have to log in to its web management panel to click the WPS option and setup Netgear extender via WPS.
Can’t Setup Netgear Extender?
There are chances that you might fail to set up your WiFi range extender. In that case, follow these tips:
- Restart your range extender by powering it off and then switching it on after a gap of a few seconds.
- During the setup process via the manual method, you should connect your computer to Netgear_EXT SSID only.
- The distance between your extender and main router must not be more than 10 ft. If there are too many physical obstructions, reduce this gap also.
- You must plug your Netgear range extender and the main router into perfectly working wall sockets only.
- While using the manual method for setup, you must use an updated and cache-free web browser. Also, input the Netgear extender login details without errors.
If even after following the above-given instructions, you cannot complete Netgear extender setup without problem, reset it to the default factory settings.
How to Reset Netgear Extender?
You can perform a factory default reset by pushing the Reset button of the extender. This button is generally found at the rear or side panel of Netgear extender. To press it, you need to use a paper clip or another pointed object. Thereafter, you need to start New Extender Setup.
How to Access New Extender Setup Wizard?
Accessing the Netgear Genie Setup wizard or simply the Smart wizard allows a person to setup the extender and change its settings. The steps to complete the process are given below:
- Connect your computer to the WiFi network of your Netgear extender.
- Open Google Chrome or Microsoft Edge.
- Type the Netgear extender IP address into the address bar.
- Press the Enter key to reach the login page of your Netgear extender.
- Input admin into the Username field.
- Into the Password field, type the password given on the extender’s sticker.
- Click Log In.
- You have reached the New Extender Setup wizard.
- Follow the on-screen prompts to complete the setup process.
This is how you can access the Netgear Genie setup wizard for the new extender’s installation. The steps remain the same for further logins. However, you have to use the new password of the extender. Just in case you fail to access the extender’s dashboard, update the web browser and erase its cache.